The Battle of Midway: aviation event history
How Japan's Naval Ambition Was Shattered in Four Days of Combat

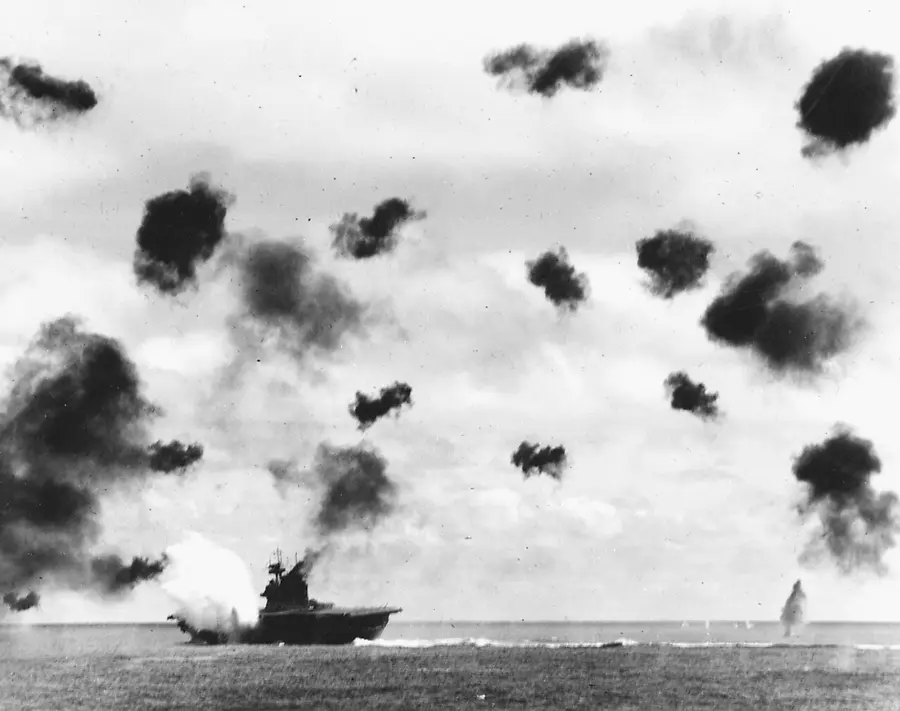
The Battle of Midway: The Turning Point of the War in the Pacific
Now that it is summertime, and more pointedly, we have just passed the 84th anniversary of the Battle of Midway, it is very pertinent to review this section of aviation history. Yes, this has a relationship to travel and aviation as a whole. For additional context, see my articles “The Fallacy of Stealth” and “Keeping (Women) Travelers Safe, Confident, and Informed.” This relates to making travelers smarter.
Without further ado, let's review the Battle of Midway, the turning point of the war in the Pacific.
From June 4–7, 1942, one month after the first true carrier sea battle, in which neither side saw the other, the Battle of the Coral Sea, and six months after the attack on Pearl Harbor, World War II took a dramatic turn in the Pacific Theater of Operations, which was really its own war within the larger conflict. The Battle of Midway Atoll, about 1,300 miles northwest of Oahu, Hawaii, was fought between the United States Navy and the Imperial Japanese Navy of the Empire of Japan.
To say Midway was decisive is a massive understatement. In essence, Japan desired to extend its Pacific defense perimeter, especially after the Doolittle air raid on Tokyo in April 1942, and to clear the seas for attacks on Midway, Fiji, Samoa, and Hawaii. A related Japanese attack on the Aleutian Islands began one day earlier, on June 3, though this was a diversionary strike. The Japanese strike force at Midway, known as the Kidō Butai, translated as “Carrier Striking Force,” was commanded by Vice Admiral Chūichi Nagumo.
Yamamoto's plan for the operation, which depended on precise timing and coordination, was undermined by its wide dispersal of forces, which left the rest of the fleet unable to support the Kidō Butai effectively.
Some Historical Background
Some background context is provided here for historical understanding, and it is truly quite fascinating. After expanding the war in the Pacific to include Western colonies, the Japanese Empire quickly attained its initial strategic goals: then-British Hong Kong (now Hong Kong of the People's Republic of China), the Philippines, British Malaya (now Malaysia), then-British Singapore (now the independent republic of Singapore), and the Dutch East Indies, whose oil resources were particularly important to Japan. Because of this, preliminary planning for the second phase of operations commenced as early as January 1942.
Because of strategic disagreements between the Imperial Japanese Army (IJA) and Imperial Japanese Navy (IJN), as well as infighting between the Navy's Imperial General Headquarters and Admiral Isoroku Yamamoto's Combined Fleet, a follow-up strategy was not formed until April 1942. Yamamoto finally won the bureaucratic struggle with a thinly veiled threat to resign, after which his plan was adopted.
Yamamoto's primary strategic goal was the elimination of America's carrier forces, which he regarded as the principal threat to the overall Pacific campaign. This concern was acutely heightened by the Doolittle Raid on April 18, 1942, in which 16 United States Army Air Forces (USAAF) B-25 Mitchell bombers launched from the USS Hornet and bombed targets in Tokyo and several other Japanese cities.
The raid, while militarily insignificant, was a shock to the Japanese and highlighted a gap in the defenses around the Japanese home islands, as well as the vulnerability of Japanese territory to American bombers. The Doolittle Raid was psychological warfare executed to perfection. This “psyop,” along with other successful hit-and-run raids by American carriers in the South Pacific, ordered by the newly appointed Commander in Chief, U.S. Pacific Fleet (CINCPAC), Admiral Chester W. Nimitz, showed that American carriers were still a threat, although seemingly reluctant to be drawn into an all-out battle.
Yamamoto reasoned that another air attack on Naval Station Pearl Harbor would induce the entire American fleet to sail out to fight, including the carriers. However, considering the increased strength of American land-based airpower on the Hawaiian Islands since the December 7, 1941, attack, he judged that it was too risky to attack Pearl Harbor directly.
Instead, Yamamoto selected Midway, a tiny atoll at the extreme northwest end of the Hawaiian Island chain, from Oahu. Midway was outside the effective range of almost all the American aircraft stationed on the main Hawaiian Islands. It was not especially important in the larger scheme of Japan's intentions, but the Japanese felt the Americans would consider Midway a vital outpost of Pearl Harbor and would be compelled to defend it vigorously.
The U.S. did, indeed, consider Midway vital. Following the battle, the establishment of a U.S. submarine base at Naval Air Facility Midway Island allowed submarines operating from Pearl Harbor to refuel and reprovision, extending their radius of operations by 1,200 miles (1,900 km). In addition to serving as a central seaplane base, Midway's airstrips then served as a forward staging point for bomber attacks on Wake Island.
Typical of Japanese naval planning during World War II, Yamamoto's battle plan for taking Midway, codenamed Operation MI, was exceedingly—and unnecessarily—complex. It required the careful coordination of multiple battle groups over hundreds of miles of open sea.
His design was also predicated on optimistic intelligence suggesting that USS Enterprise and USS Hornet, forming Task Force 16, were the only carriers available to the Pacific Fleet. This was a severe miscalculation.
During the Battle of the Coral Sea one month earlier, the fleet carrier USS Lexington had been sunk, and her sister, USS Yorktown, had suffered so much damage that the Japanese believed she, too, had been lost. However, following hasty repairs—dockyard workers spent a constant 36 hours working on Yorktown—at Pearl Harbor, Yorktown sortied and ultimately played a critical role in the discovery and eventual destruction of the Japanese fleet carriers at Midway.
Finally, much of Yamamoto's planning, coinciding with the general feeling among the Japanese leadership at the time, was based on a gross misjudgment of American morale, which was believed to be debilitated by the string of Japanese victories in the preceding months.
Yamamoto felt deception would be required to lure the U.S. fleet into a fatally compromised situation. To this end, he dispersed his forces so that their full extent, particularly his battleships, would be concealed from the Americans prior to battle. Critically, Yamamoto's supporting battleships and cruisers trailed Vice Admiral Chūichi Nagumo's carrier force by several hundred miles, an average estimate of approximately 300 miles.
The original plans for the Midway attack are missing, but in academia, one school of thought holds that the Navy was intended to come up and destroy whatever elements of the American fleet might come to Midway's defense once Nagumo's carriers had weakened them sufficiently for a daylight gun battle. This tactic was accepted doctrine in most major navies of the time. The Japanese took the stratagem one step further by adopting the concept of the pursuit of the Kantai Kessen, or “Decisive Final Battle.”
Another theory of Yamamoto's intentions is that he distrusted the effectiveness of battleships in general and had no intention of using them in the battle, but dispatched them only for reasons of Navy politics and morale. He had, thus far, left the battleships out of combat, and he sought to appease the battleship faction on the Navy General Staff by himself sailing on the battleship IJN Yamato, at the time the largest warship ever built.
There were two Yamato-class battleships built: Yamato herself and Musashi.
Both massive battleships were sunk by the end of the war. The largest battleships ever built by displacement were the U.S. Navy's Iowa-class battleships, which saw service at the very end of World War II, as well as during the Korean War and Vietnam War. One was also responsible for a missile bombardment during the first Gulf War.
Battleship Theory vs. Carrier Doctrine
We must briefly discuss the two prevailing doctrinal disciplines playing against each other at the time: the Battleship Theory versus the Carrier Doctrine.
The Battleship Theory believed in the old-school philosophy of the superiority of so-called “big-gun” battleships to “rule the waves.” The Carrier Doctrine is best espoused by IJN Commander Minoru Genda, who became a major general and chief of aviation in the new Japan Air Self-Defense Force after the war. Genda famously said—and wrote—“He who controls the sky controls the waves, and thus the world.”
In short, Genda was a strong advocate for the power of air superiority.
Unknown to Yamamoto, the U.S. had broken parts of the main Japanese naval code, dubbed JN-25 by the Americans, divulging many details of his plan. His emphasis on dispersal prevented his formations from supporting each other.
For instance, although Nagumo's carriers were expected to carry out strikes against Midway and bear the brunt of American counterattacks, the only warships in his fleet larger than the screening force of 12 destroyers were two Kongō-class fast battleships, two heavy cruisers, and one light cruiser. By contrast, Yamamoto and Kondo had between them two light escort carriers, five battleships, four heavy cruisers, and two light cruisers, none of which saw action at Midway.
The pair of light carriers belonging to the trailing forces and Yamamoto's three main battleships, out of Yamamoto and Kondo's combined five, were unable to keep pace with the carriers of the Kidō Butai.
If the other elements of the invasion force needed more defense, the Kidō Butai would have to make best speed to defend them. Hence, the slower ships could not remain with the Kidō Butai.
The distance between Yamamoto and Kondo's forces and Nagumo's carriers had grave implications during the battle. The invaluable reconnaissance capability of the scout planes carried by the cruisers and carriers, as well as the additional antiaircraft capability of the cruisers and the other two Kongō-class battleships in the trailing forces, were unavailable to help Nagumo.
To obtain support from the IJA for the Midway operation, the IJN agreed to support their invasion of the United States through the Aleutian Islands of Attu and Kiska, part of the Alaska Territory. The IJA occupied these islands to place the Japanese home islands out of range of U.S. land-based bombers in Alaska. Most Americans feared that the occupied islands would be used as bases for Japanese bombers to attack strategic targets and population centers along the U.S. West Coast.
The Japanese operations in the Aleutians, Operation AL, removed yet more ships that could otherwise have augmented the force striking Midway. Whereas many earlier historical accounts considered the Aleutians operation a feint to draw American forces away, according to the original Japanese battle plan, AL was intended to be launched simultaneously with the attack on Midway. A one-day delay in the sailing of Nagumo's task force resulted in Operation AL beginning a day before the Midway attack.
The American Response
To do battle with the IJN, the U.S. expected to muster four or five carriers, but these numbers weren't available. The newly appointed admiral in command, Admiral Chester W. Nimitz, Commander-in-Chief, Pacific Ocean Areas (CINCPAC), nonetheless needed every available flight deck.
He already had Vice Admiral William “Bull” Halsey's two-carrier task force, Enterprise and Hornet, at hand. However, Halsey was stricken with shingles and had to be replaced by Rear Admiral Raymond A. Spruance, Halsey's escort cruiser commander.
Nimitz also hurriedly recalled Rear Admiral Frank “Jack” Fletcher's task force, including the carrier Yorktown, from the Southwest Pacific Area of Operations.
Despite estimates that Yorktown, heavily damaged in the Battle of the Coral Sea, would require several months of repairs at Puget Sound Naval Shipyard in Seattle, her elevators were intact and her flight deck was largely intact. The Pearl Harbor Naval Shipyard worked around the clock, and within 72 hours she was restored to a battle-ready state, judged good enough for two or three weeks of operations, as Admiral Nimitz required.
Yorktown's partially depleted air group was rebuilt using whatever planes and pilots could be found. In terms of squadrons, Scouting Five (VS-5) was replaced with Bombing Three (VB-3) from the nearly destroyed carrier USS Saratoga, and so on.
As a result, many of these American aircrews were drastically inexperienced, especially in combat.
IJN Initial Composition
The Kidō Butai consisted of the most powerful and versatile warships in the entire IJN, which was indeed formidable. The striking force was centered around Japan's six largest fleet carriers: Akagi (designated as the force's flagship), Kaga, Sōryū, Hiryū, Shōkaku, and Zuikaku, though the last two carriers were unavailable, as I'll explain later.
Support and escort ships in the immediate striking force included:
- 2 battleships (Hiei and Kirishima)
- 2 heavy cruisers (Tone and Chikuma)
- 1 light cruiser (Abukuma)
- 9 destroyers
- 8 oil tankers
- 23 fleet submarines
- 5 "midget submarines" (small submarines with a crew of 5 and usually an armament of 4–6 torpedoes, often carried, especially in this case, by larger fleet submarines for picket duty).
Midway Atoll: An Airfield of Coffins
The atoll itself was an airfield of coffins.
On Midway, the U.S. Navy had, by June 4, stationed four squadrons of PBY flying boats—31 aircraft in total—for long-range reconnaissance duties, along with six brand-new Grumman TBF Avengers from Hornet's VT-8.
The Marine Corps stationed 19 Douglas SBD Dauntlesses, seven F4F-3 Wildcats, 17 Vought SB2U Vindicators, and 21 Brewster F2A Buffalos.
The USAAF contributed a squadron of 17 B-17 Flying Fortresses and four Martin B-26 Marauders equipped with torpedoes, for a total of 122 aircraft.
Although the F2As and SB2Us were already obsolete, known as “flying coffins,” they were the only aircraft available to the Marine Corps at the time.
During the Battle of the Coral Sea one month earlier, the Japanese light carrier Shōhō had been sunk, and the fleet carrier Shōkaku had been severely damaged and was in dry dock for repairs. Although the fleet carrier Zuikaku escaped the battle undamaged, she had lost almost half her air group and was in port at the Kure Naval District in Hiroshima, awaiting replacement aircraft and pilots.
That there were none immediately available can be attributed to the growing inability of the IJN to properly train pilots faster than they were being killed in action. In desperation, instructors from the Yokosuka Air Corps were relieved of their duties to fill the vacancies, but it wasn't nearly enough.
Thus, Carrier Division 5, consisting of the two most advanced aircraft carriers of the Kidō Butai, was not available. This meant Vice Admiral Nagumo had only two-thirds of the fleet carriers at his disposal: Kaga and Akagi, forming Carrier Division 1, and the faster carriers Hiryū and Sōryū, making up Carrier Division 2.
This was partly due to fatigue. Japanese carriers had been constantly on operations since December 7, 1941, including raids on Darwin and Colombo in the Indian Ocean.
Nonetheless, the First Carrier Strike Force sailed with 248 available aircraft on the four carriers: 60 on Akagi, 74 on Kaga (the B5N2 bomber squadron was oversized), 57 on Hiryū, and 57 aircraft on Sōryū.
The main Japanese carrier-borne strike aircraft were the Aichi D3A1, codenamed “Val,” dive bomber, and the Nakajima B5N2, codenamed “Kate,” which was used either as a torpedo bomber or as a level bomber.
The main carrier fighter was the fast and highly maneuverable Mitsubishi A6M Zero.
For a variety of reasons, production of the “Val” had been drastically reduced, while that of the “Kate” had been stopped completely. As a consequence, there were none available to replace losses, and no vital repair parts were available. In addition, many of the aircraft being used during the June 1942 operations had been operational since late November 1941 and, although they were well maintained, many were almost worn out and had become increasingly unreliable.
These factors meant all carriers of the Kidō Butai had fewer aircraft than their normal complement, with few spare aircraft or parts in the carriers' hangars.
In addition, Nagumo's carrier force suffered from several defensive deficiencies. The carriers' fueling systems consisted of a network of highly flammable, fuel-filled lines that allowed fires to spread rapidly. The carrier interiors were composed of wood flooring, internal timber support beams, cotton pipe insulation, and other flammable materials.
The firefighting systems were fed by water mains that were vulnerable to bomb or fire damage. The carriers were not even equipped with fire-suppressing foam; firefighting teams had to make do with water alone, pumped in from the sea.
Furthermore, the IJN's fleet combat air patrol (CAP) had too few fighter aircraft and was hampered by an inadequate early warning system, including a lack of radar. Poor radio communications with the fighter aircraft severely inhibited effective command and control.
Japanese Reconnaissance Fails
Japanese strategic scouting arrangements prior to the battle were also in disarray.
A picket line of Japanese submarines was late getting into position, partially owing to Yamamoto's haste, which allowed the American carriers to reach their assembly point northeast of Midway, known as “Point Luck,” without being detected.
A second attempt at reconnaissance, using four-engine H8K flying boats to scout Pearl Harbor prior to the battle and detect whether the American carriers were present, was part of Operation K, a planned dedicated reconnaissance operation. However, the mission was thwarted when Japanese submarines assigned to refuel the search aircraft discovered that the intended refueling point—a hitherto deserted bay off French Frigate Shoals—was occupied by American warships because the Japanese had carried out an identical mission in March.
Thus, Japan was deprived of any knowledge concerning the movements of the American carriers immediately before the battle.
Japanese radio intercepts did notice an increase in American submarine activity and message traffic. This information was in Yamamoto's and Nagumo's hands prior to the battle. Japanese plans were not changed.
Yamamoto, at sea aboard Yamato, assumed Nagumo had received the same signal from Tokyo and did not communicate with him by radio so as not to reveal his position.
Given that Yamamoto did not want to reveal his position, we can reasonably conclude that he had decided the Americans were not preparing to successfully ambush him at Midway. His thinking appears to have been that even if the Americans were preparing to defend Midway, they would not know all the details of what defense was required—what defense, where, and, most critically, when.
Since early 1942, the U.S. had been decoding messages stating that there would soon be an operation at objective “AF.” It was initially not known where “AF” was, but Commander Joseph Rochefort and his team at Station HYPO on Oahu were able to confirm that it was Midway.
Captain Wilfred Holmes devised the ruse of telling the base at Midway, via secure undersea communications cable, to broadcast an uncoded radio message stating that Midway's water purification system had broken down.
Within 24 hours, the code breakers picked up a Japanese message stating that “AF” was short on water.
The Japanese seemed unconcerned that the Americans were broadcasting uncoded information that a major naval installation close to Japan was experiencing a water shortage, which Japanese intelligence might have suspected was deception.
Station HYPO was also able to determine the date of the attack as either June 4 or 5 and provide Nimitz with a complete IJN order of battle.
As a result, Nimitz knew that the Japanese had negated their numerical advantage by dividing their ships into four separate task groups, so widely separated that it was essentially impossible for any one group to support another.
This dispersal resulted in few fast warships, notably fast battleships, cruisers, destroyers, and frigates, being available to escort the Carrier Striking Force, thereby reducing the number of antiaircraft guns protecting the carriers.
The Battle of Midway: June 4–7, 1942
The sequence of the battle is presented in timeline form for ease of digestion. The entire battle, planned for months, took place and was essentially decided in the span of one afternoon. Aftermath operations continued over the weekend.
June 4
- 04:30 — First Japanese aircraft take off against Midway Island.
- 04:30 — Ten aircraft from Yorktown begin searching for the Japanese ships.
- 05:34 — Japanese ships are detected by a PBY from Midway.
- 07:10 — Six TBF Avengers and four USAAF B-26s from Midway attack.
- 07:15 — RADM. Nagumo prepares reserve aircraft for a second attack on Midway, in direct violation of Yamamoto's order.
- 07:40 — American naval forces are spotted by Cruiser Tone No. 4.
- 07:50 — Sixty-seven dive bombers, 29 torpedo bombers, and 20 Wildcats take off under Spruance.
- 07:55 — Sixteen U.S. Navy dive bombers from Midway attack.
- 08:10 — Fifteen B-17s from Midway attack.
- 08:20 — Eleven U.S. Navy bombers from Midway attack.
- 08:20 — “The enemy is accompanied by what appears to be a carrier,” reports Tone's No. 4.
- 09:06 — Twelve torpedo bombers, 17 dive bombers, and six Wildcats take off from Yorktown.
- 09:10 — Cmdr. Tomonaga's strike force lands safely.
- 09:18 — Nagumo turns northeast.
- 09:25 — Fifteen torpedo bombers from Hornet attack.
- 09:30 — Fourteen torpedo bombers from Enterprise attack.
- 10:00 — Twelve torpedo bombers from Yorktown attack.
- 10:25 — Thirty dive bombers from Enterprise attack Akagi and Kaga.
- 10:25 — Seventeen dive bombers from Yorktown attack Sōryū.
- 11:00 — Eighteen Vals and six Zeros take off from Hiryū.
- 11:30 — Ten aircraft from Yorktown take off to search for remaining Japanese ships.
- 12:05 — First attack on Yorktown.
- 13:30 — Hiryū is detected by a Yorktown aircraft.
- 13:31 — Ten Kates and six Zeros take off from Hiryū.
- 13:40 — Yorktown is again in service, making 18 knots.
- 14:30 — Second attack on Yorktown.
- 15:00 — Yorktown is abandoned.
- 15:30 — Twenty-four dive bombers take off against Hiryū from Enterprise.
- 16:10 — Sōryū sinks.
- 17:00 — Dive bombers attack Hiryū.
- 19:25 — Kaga sinks.
June 5
- 05:00 — Akagi sinks.
- 09:00 — Hiryū sinks after being scuttled.
June 7
- 07:00 — Yorktown sinks from battle damage.
Nagumo's Dilemma
The dilemma faced by Nagumo was a brutal one, as we will see.
In accordance with Yamamoto's orders for Operation MI, Nagumo had kept half of his aircraft in reserve: two squadrons each of dive bombers and torpedo bombers. The dive bombers were as yet unarmed. By standard procedure, dive bombers were to be armed on the flight deck. The torpedo bombers were armed with torpedoes against possible American warships.
At 07:15, Nagumo ordered his reserve planes to be rearmed with contact-fused general-purpose bombs for use against land targets. This was intended to counter the attacks from Midway, as well as to respond to the morning flight commander's recommendation for a second strike.
Rearming had been underway for about 30 minutes when, at 07:40, the delayed scout plane from Tone signaled that it had sighted a sizable American naval force to the east but did not specify its composition. Later evidence suggests Nagumo did not receive the sighting report until approximately 08:00, when it was too late to act.
Nagumo swiftly reversed his order to rearm the bombers and demanded that the scout plane ascertain the type of ships in the American force. Another 20–40 minutes elapsed before Tone's scout finally radioed the presence of a single carrier in the American force.
This was one of the carriers from Task Force 16; the other carrier was not sighted.
Nagumo now faced a quandary.
Rear Admiral Tamon Yamaguchi, leading Carrier Division 2, Hiryū and Sōryū, suggested that he strike immediately with the forces at hand: 16 D3A1 dive bombers on Sōryū and 18 on Hiryū, with half the ready combat air patrol aircraft.
Nagumo's opportunity to hit the American ships was now limited by the imminent return of his Midway strike force. The returning strike force needed to land promptly, or it would have to ditch into the sea.
Because of the constant flight deck activity associated with combat air patrol operations during the preceding hour, the Japanese never had an opportunity to position their reserve planes on the flight deck for launch.
What few aircraft remained on the Japanese flight decks at the time of the attack were either defensive fighters or, in the case of Sōryū, fighters being positioned to augment the combat air patrol.
Furthermore, by spotting and launching immediately, Nagumo would be committing some of his reserves to battle without proper antiship armament and likely without fighter escort.
Indeed, he had just witnessed how easily the unescorted American bombers had been shot down.
The end came swiftly.
By chance, at the same time the U.S. carrier forces were sighted by the Japanese, three squadrons of SBDs from Enterprise and Yorktown were approaching from the southwest and northeast.
The Yorktown squadron, VB-3, had flown just behind VT-3 but elected to attack from a different course. The two squadrons from Enterprise, VB-6 and VS-6, were running low on fuel because of the time spent looking for the Japanese ships.
Air Group Commander C. Wade McClusky Jr. decided to continue the search and, by good fortune, spotted the wake of the Japanese destroyer Arashi, steaming at full speed to rejoin Nagumo's carriers after having unsuccessfully depth-charged the U.S. submarine Nautilus, which had, in turn, unsuccessfully attacked the battleship Kirishima.
Some bombers were lost from fuel exhaustion before the attack commenced, but this was inconsequential.
McClusky's choice to persist with the search and his judgment, in the opinion of Admiral Chester Nimitz, “decided the fate of our carrier task force and our forces at Midway.”
All three American dive-bomber squadrons—VB-6, VS-6, and VB-3—arrived almost simultaneously at the perfect time, from the right locations, and at the right altitudes to attack.
Most of the Japanese CAP was directing its attention to the torpedo planes of the ill-fated VT-3 and was out of position. Meanwhile, armed Japanese strike aircraft filled the hangar decks, with fuel hoses snaked across the decks for hasty refueling. The repeated changes of ordnance meant that bombs and torpedoes were stacked around the hangars rather than safely stowed in the magazines, rendering the Japanese carriers disastrously vulnerable.
Beginning at 10:22, the two squadrons of Enterprise's air group split up with the intention of sending one squadron each to attack Kaga and Akagi. A miscommunication caused both squadrons to dive at Kaga.
Recognizing the error, Lieutenant Richard Halsey Best and his two wingmen were able to pull out of their dives and, after judging that Kaga was doomed, headed north to attack Akagi.
Coming under an onslaught of bombs from almost two full squadrons, Kaga sustained three to five direct hits, which caused heavy damage and ignited multiple conflagrations. One of the bombs landed on or right in front of the bridge, killing Captain Jisaku Okada and most of the ship's senior officers.
Lieutenant Clarence E. Dickinson, part of McClusky's group, recalled in his memoirs:
“We were coming down in all directions on the port side ... I recognized her as the Kaga; and she was enormous ... The target was utterly satisfying ... I saw a bomb hit just behind where I was aiming ... I saw the deck rippling and curling back in all directions exposing a great section of the hangar below ... I saw [my] 500 lb bomb hit right abreast of the [carrier's] island. The two 100 lb bombs struck in the forward area of the parked planes ...”
Several minutes later, Best and his two wingmen dived on Akagi.
Mitsuo Fuchida, the aviator who had led the attack on Pearl Harbor, was on Akagi when it was hit and described the attack:
A lookout screamed, “Hell-Divers!” and pointed up. I looked up, following his pointed hand, to see three black enemy planes plummeting toward our ship. Some of our machine guns managed to fire a few frantic bursts at them, but it was too late.
Although Akagi sustained only one direct hit, almost certainly dropped by Lieutenant Best, it proved to be a fatal blow. The bomb struck the edge of the midship deck elevator and penetrated to the upper hangar deck, where it exploded among the armed and fueled aircraft in the vicinity.
Nagumo's chief of staff, Rear Admiral Ryūnosuke Kusaka, recorded the devastation: a terrific fire, bodies everywhere, and planes standing tail-up while belching flames and black smoke, making it impossible to bring the fires under control.
Another bomb exploded underwater very close astern. The resulting geyser bent the flight deck upward “in grotesque configurations” and caused crucial rudder damage.
Within six minutes, Sōryū and Kaga were ablaze from stem to stern.
Akagi, having been struck by only one bomb, took longer to burn, but the resulting fires quickly expanded and proved impossible to extinguish. She, too, was eventually consumed by flames and had to be abandoned.
Although Nagumo was reluctant to leave Akagi, Kusaka was able to persuade him. At 10:46, Nagumo transferred his flag to the light cruiser Nagara.
All three carriers remained temporarily afloat, as none had suffered damage below the waterline, other than the rudder damage to Akagi caused by the near miss close astern.
Despite initial hopes that Akagi could be saved or at least towed back to Japan, all three carriers were eventually abandoned and scuttled.
While Kaga was burning, Nautilus showed up again and launched three torpedoes at her, scoring one dud hit. Kaga was later sunk by the Japanese destroyer Hagikaze in a scuttling action during the retreat.
Hiryū Strikes Back
Hiryū, the sole surviving Japanese aircraft carrier, wasted little time in counterattacking.
Hiryū's first attack wave, consisting of 18 D3As dive-bombers and six Zeros, followed the retreating American aircraft and attacked the first carrier they encountered, Yorktown. They hit her with three bombs, which blew a hole in the deck, knocked out all but one of her boilers, and destroyed one antiaircraft mount.
The damage forced Admiral Fletcher to move his command staff to the heavy cruiser Astoria. Damage-control parties were able to temporarily patch the flight deck and restore power to several boilers within an hour, giving her a speed of 19 knots and enabling her to resume air operations.
Yorktown hoisted a flag signal to indicate a speed of five knots.
News of the strike, along with mistaken reports that each deployed Japanese air group had sunk an American carrier, greatly improved Japanese morale.
The few surviving aircraft were all recovered aboard Hiryū. Despite the heavy losses, the Japanese believed they could scrape together enough aircraft for one more strike against what they believed to be the only remaining American carrier.
Late in the afternoon, a Yorktown scout aircraft located Hiryū, prompting Enterprise to launch a final strike of 24 dive bombers: six SBDs from VS-6, four SBDs from VB-6, and 14 SBDs from Yorktown's VB-3.
Despite Hiryū being defended by more than a dozen Zero fighters, the attack by Enterprise and the orphaned Yorktown aircraft launched from Enterprise was successful. Four bombs, possibly five, hit Hiryū, leaving her ablaze and unable to operate aircraft.
Hornet's strike, launched late because of a communications error, concentrated on the remaining escort ships but failed to score any hits.
A bomb from the Enterprise dive bomber piloted by Dusty Kleiss struck Hiryū on the bow, essentially crippling her.
The battle was over.
The Japanese had lost nearly everything.
Soon after being spotted, Hiryū sank. Admiral Tamon Yamaguchi, along with the ship's captain, Cpt. Tomeo Kaku, chose to go down with the ship, costing Japan perhaps its best carrier officer.
The American Withdrawal
Fletcher, obliged to abandon the derelict Yorktown and feeling he could not adequately command from a cruiser, ceded operational command to Spruance.
Fearing a possible night encounter with Japanese surface forces and believing Yamamoto still intended to invade, based in part on a misleading contact report from the submarine Tambor, Spruance changed course and withdrew to the east, turning back west toward the Japanese at midnight.
For his part, Yamamoto initially decided to continue the engagement and sent his remaining surface forces searching eastward for the American carriers. Simultaneously, he detached a cruiser raiding force to bombard the island.
The Japanese surface forces failed to make contact with the Americans because Spruance had briefly withdrawn eastward, and Yamamoto ordered a general withdrawal to the west.
It was fortunate for the U.S. that Spruance did not pursue. Had he come in contact with Yamamoto's heavy ships, including Yamato, in the dark, considering the Japanese Navy's superiority in night-attack tactics at the time, there is a very high probability that his cruisers would have been overwhelmed and his carriers sunk.
Over the next two days, several strikes were launched against the retreating stragglers, first from Midway and then from Spruance's carriers.
The heavy cruiser Mikuma, which was sunk, with 700 casualties, and its sister ship, Mogami, which survived further severe damage to return home for repairs, were both attacked.
The destroyers Arashio and Asashio were also bombed and strafed during the last of these attacks.
Captain Richard E. Fleming, a U.S. Marine Corps aviator, was killed while executing a daring bomb run on Mikuma and was posthumously awarded the Medal of Honor.
The Casualties
By the time the battle ended, 3,057 Japanese had died.
Casualties aboard the four carriers were:
- Akagi: 267
- Kaga: 811
- Hiryū: 392, including Yamaguchi, who chose to go down with his ship
- Sōryū: 711, including Captain Yanagimoto, who chose to remain aboard
That brought the carrier total to 2,181.
The heavy cruisers Mikuma, which was sunk, with 700 casualties, and Mogami, which was badly damaged, with 92 casualties, together accounted for another 792 deaths.
In addition:
- Destroyer Arashio: 35 deaths
- Destroyer Asashio: 21 deaths
- Cruiser Chikuma: three deaths among its floatplane crews
- Cruiser Tone: two deaths among its floatplane crews
- Destroyer Tanikaze: 11 deaths
- Destroyer Arashi: one death
- Destroyer Kazagumo: one death
- Fleet oiler Akebono Maru: 10 deaths
These accounted for the remaining casualties.
On the other side, the U.S. lost the carrier Yorktown and the destroyer USS Hammann.
Three hundred seven American servicemen were killed, including Major General Clarence L. Tinker, commander of the 7th Air Force, who personally led a bomber strike from Hawaii against the retreating Japanese forces on June 7.
He was killed when his aircraft crashed near Midway Atoll.
Tinker Air Force Base in Oklahoma bears his name today in remembrance.
Why Did Japan Lose at Midway?
War knows no nation.
As poignant a phrase as that is, it does not answer the most pointed question: Why did the Japanese lose?
The Imperial Navy had everything going for it: power, experience, confidence, and numbers.
Let us be clear.
The Americans did not simply win Midway. The Japanese lost this battle.
Nagumo made critical errors in judgment that contributed to the loss of this pivotal battle of the war.
Sun Tzu said that wars and battles are often lost long before soldiers and armies are positioned on the battlefield.
In many ways, this battle was lost in the debates and staff halls of General Headquarters in Tokyo.
The Japanese had the ships. They had the aircraft. They had experienced crews. They had confidence.
What they did not have was the ability to effectively bring all of those advantages together.
Midway demonstrated that wars are not won simply by having more ships, more aircraft, or more firepower. They are won through intelligence, coordination, adaptability, timing, leadership, and the ability to recognize when a carefully constructed plan is beginning to fall apart.
And perhaps that is one of the most important lessons Midway can teach us today—not only about aviation and military history, but about decision-making itself.
Thank you for joining us today on Brooke In The Air Travel.